Mikirin kamu….. hwakkkkakaka
View on Path
| Code quality | Latest release |
|---|---|
Develop using the Template Attribute Language instead of having clumsy <?php echo $var; ?> tags in your markup.
Read more at the PHPTAL site
Download dan Bongkar File ZIP atau rar ataau tar
zip = unzip (untuk membongkar ZIP)

Jika terjadi error, maka coba rename folder aplikasi
rm - remove files or directories
rm [OPTION]... FILE...
I have Ubuntu Server 12.04.3 LTS set up and working.
I have LAMP installed and I have OwnCloud 6.0.1 set up and working. I can access my OwnCloud from anywhere.
I have my Cisco router forwarding my port (8056) to internal port 80. Everything works good here.
IP: 205.123.123.123:8056/owncloud (I changed my actual IP here, but this is the basic structure on HTTP port.
I do not have a registerd domain name and do not plan on getting one.
I am a novice with servers, especially with command line (I am used to visual/gui)
I want a secure data transmission (https) rather than Http.
I have followed different tutorials but none have worked for me, I am not sure where I am going wrong.
The following steps are what I have done, that have failed.
(I created a port foward in my router to listen for port 4431 and forward it to 443 at my local 192.168.2.249 address)
~~~~~
Steps on how to enable Https:
Terminal-Root
sudo -i
Enable SSL
a2enmod ssl
Restart Apache
service apache2 restart
Make Directory for Key and Cert
mkdir /etc/apache2/ssl
Create a Self Signed SSL Certificate
openssl req -x509 -nodes -days 3650 -newkey rsa:2048 -keyout /etc/apache2/ssl/apache.key -out /etc/apache2/ssl/apache.crt
Country Name (2 letter code) [AU]:US
State or Province Name (full name) [Some-State]:Coldest State Ever
Locality Name (eg, city) []:Coldest City Ever
Organization Name (eg, company) [Internet Widgits Pty Ltd]:My Home
Organizational Unit Name (eg, section) []:My Dept
Common Name (e.g. server FQDN or YOUR name) []: 205.123.123.123:4431/owncloud
Email Address []:<email address hidden>
Open up the SSL config file:
nano /etc/apache2/sites-available/default-ssl
Within the section <VirtualHost _default_:443> Add a line with your server name right below the Server Admin email:
ServerName 205.123.123.123:4431/owncloud
Add the following three lines within the <VirtualHost _default_:443> tags
SSLEngine on
SSLCertificateFile /etc/apache2/ssl/apache.crt
SSLCertificateKeyFile /etc/apache2/ssl/apache.key
Save and Exit out.
Enable Virtual Host:
a2ensite default-ssl
Restart Apache
service apache2 reload
Open browser and navigate to https://205.123.123.123:4431/owncloud
It doesn’t work.
I am not sure what I am missing or doing wrong.
To get my owncloud working again on http I just a2dismod ssl and I can access ownCloud via http.
Resolution?
Thank you
LDAP, or Lightweight Directory Access Protocol, is a protocol for managing related information from a centralized location through the use of a file and directory hierarchy.
It functions in a similar way to a relational database in certain ways, and can be used to organize and store any kind of information. LDAP is commonly used for centralized authentication.
In this guide, we will cover how to install and configure an OpenLDAP server on an Ubuntu 12.04 VPS. We will populate it with some users and groups. In a later tutorial, authentication using LDAP will be covered.
The OpenLDAP server is in Ubuntu’s default repositories under the package “slapd”, so we can install it easily with apt-get. We will also install some additional utilities:
sudo apt-get update
sudo apt-get install slapd ldap-utils
You will be asked to enter and confirm an administrator password for the administrator LDAP account.
When the installation is complete, we actually need to reconfigure the LDAP package. Type the following to bring up the package configuration tool:
sudo dpkg-reconfigure slapd
You will be asked a series of questions about how you’d like to configure the software.
We will be administering LDAP through a web interface called PHPldapadmin. This is also available in Ubuntu’s default repositories.
Install it with this command:
sudo apt-get install phpldapadmin
That will install all of the required web server and PHP dependencies.
We need to configure some values within the web interface configuration files before trying it out.
Open the configuration file with root privileges:
sudo nano /etc/phpldapadmin/config.php
Search for the following sections and modify them accordingly.
Change the red value to the way you will be referencing your server, either through domain name or IP address.
$servers->setValue('server','host','domain_nam_or_IP_address');
For the next part, you will need to reflect the same value you gave when asked for the DNS domain name when we reconfigured “slapd”.
You will have to convert it into a format that LDAP understands by separating each domain component. Domain components are anything that is separated by a dot.
These components are then given as values to the “dc” attribute.
For instance, if your DNS domain name entry was “imaginary.lalala.com”, LDAP would need to see “dc=imaginary,dc=lalala,dc=com”. Edit the following entry to reflect the name you selected (ours is “test.com” as you recall):
$servers->setValue('server','base',array('dc=test,dc=com'));
The next value to modify will use the same domain components that you just set up in the last entry. Add these after the “cn=admin” in the entry below:
$servers->setValue('login','bind_id','cn=admin,dc=test,dc=com');
Search for the following section about the “hidetemplatewarning” attribute. We want to uncomment this line and set the value to “true” to avoid some annoying warnings that are unimportant.
$config->custom->appearance['hide_template_warning'] = true;
Save and close the file.
You can access by going to your domain name or IP address followed by “/phpldapadmin” in your web browser:
domain_name_or_IP_address/phpldapadmin
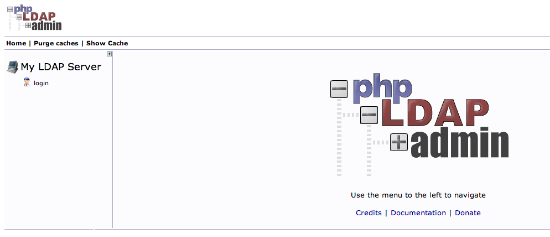
Click on the “login” link on the left-hand side.
You will receive a login prompt. The correct Login DN (distinguished name) should be pre-populated if you configured PHPldapadmin correctly. In our case, this would be “cn=admin,dc=test,dc=com”.
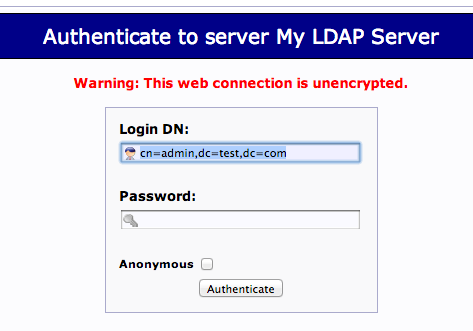
Enter the password you selected during our slapd configuration.
You will be presented with a rather sparse interface initially.
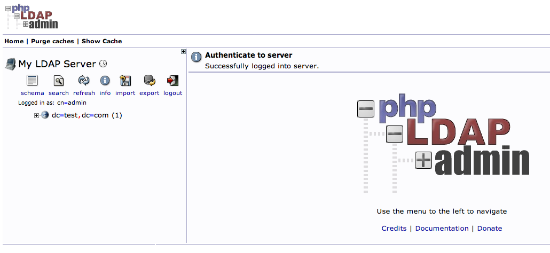
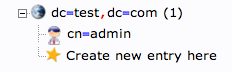
If you click on the “plus” next to the domain components (dc=test,dc=com), you will see the admin login we are using.
LDAP is very flexible. You can create hierarchies and relationships in many different ways, depending on what kind of information you need accessible and what kind of use case you have.
We will create some basic structure to our information and then populate it with information.
First, we will create some categories of information where we will place the later information. Because this is a basic setup, we will only need two categories: groups and users.
Click on the “Create new entry here” link on the left-hand side.
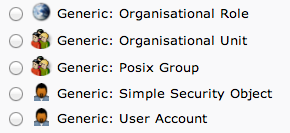
Here, we can see the different kinds of entries we can create.
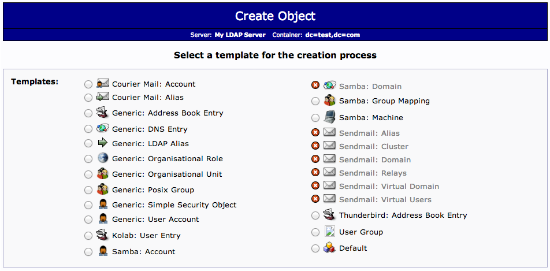
Because we are only using this as an organizational structure, rather than an information-heavy entry, we will use the “Generic: Organizational Unit” template.
We will be asked to create a name for our organizational unit. Type “groups”:
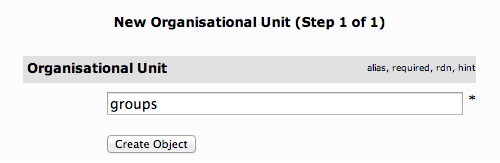
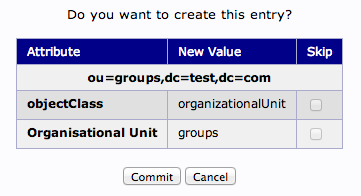
We will then need to commit the changes.
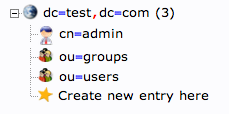
When this is complete, we can see a new entry on the left-hand side.
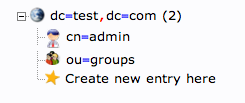
We will create one more organizational structure to get ourselves going. Repeat the procedure, but this time, use the name “users”.
When you are done, you should have something that looks like this:
We will be creating three different groups that could be used to organize users into different “access” groups based on the privileges they require.
We will create an “admin” group, an “irc” group, and a “user” group. We could then allow members of different groups to authenticate if we set up client LDAP authentication.
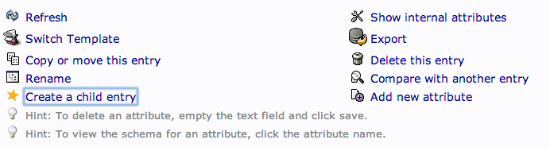
We want to create the groups within the “groups” organizational unit. Click on the “groups” category we created. In the main pane, click on the “Create a child entry” within the groups category.
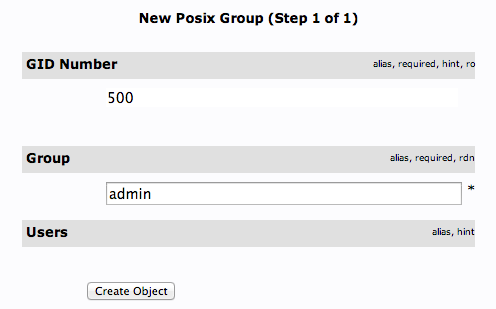
This time, we will choose the “Generic: Posix Group” category.
Fill in “admin” as the group name. Click “Create Object” and then confirm on the next page.
Repeat the process, but simply replace the “admin” name with “irc” and “user”. Be sure to re-click the “ou=groups” entry before creating child entries, or else you may create entries under the wrong category.
You should now have three groups in the left-hand panel:
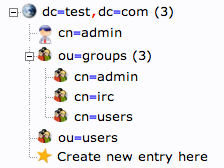
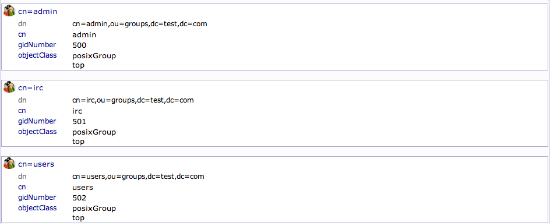
You can see an overview of the entries in the “ou=groups” category by clicking on that entry, and then clicking on “View 3 children”:
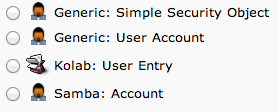
Next, we will create users to put in these groups. Start by clicking the “ou=users” category. Click on “Create a child entry”.
We will choose “Generic: User Account” for these entries.
We will be given a lot of fields to fill out:
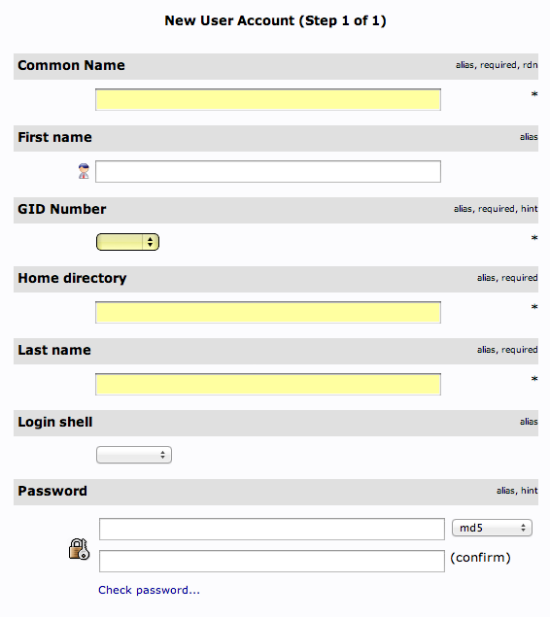
Fill in all of the entries with information that makes sense for your user.
Something to keep in mind is that the “Common Name” needs to be unique for each entry in a category. So you may want to use a username format instead of the default “FirstName LastName” that is auto-populated.
Click “Create Object” at the bottom and confirm on the following page.
To create additional users, we will take advantage of the ability to copy entries.
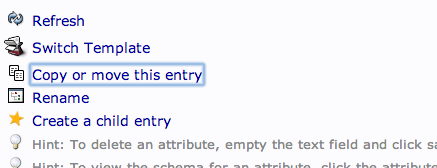
Click on the user you just created in the left-hand panel. In the main pane, click “Copy or move this entry”:
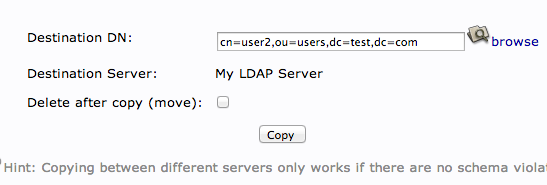
Adjust the “cn=user” portion of the entry to point it to the common name you’d like to use for the new entry. Click “Copy” at the bottom:
You will be given the next page populated with your first users data. You will need to adjust it to match the new users information.
Be sure to adjust the uidNumber. Click the “Create Object” button at the bottom.
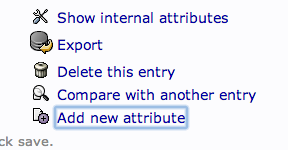
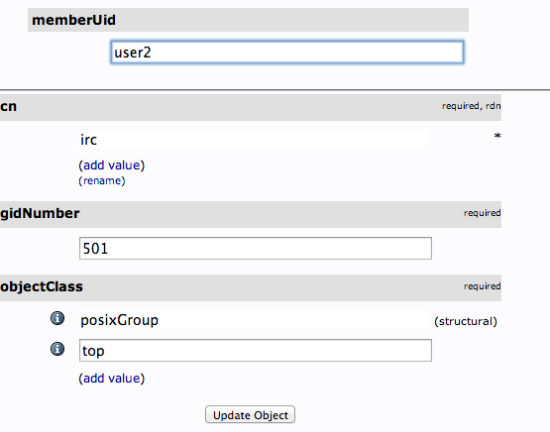
We can add users to various groups by clicking on the group in question. In the main pane, select “Add new attribute”:
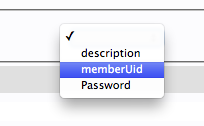
Select “memberUid” from the drop down menu:
In the text field that populates, enter the first user you’d like to add. Click “Update Object” at the bottom:
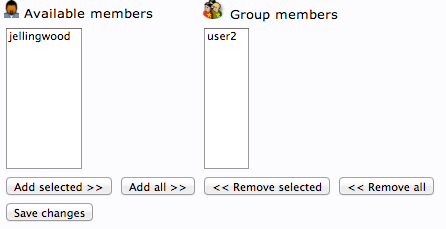
You can then add more members by clicking “modify group members” and selecting them from the available choices:
You should now have a basic LDAP server set up with a few users and groups. You can expand this information and add all of the different organizational structures to replicate the structure of your business.
We will cover in another section how to authenticate using the LDAP credentials for various services.
Sumber : https://www.digitalocean.com
Share Ilmu ya

By Wikipedia
LDAP is an acronym for Lightweight Directory Access Protocol. is an application protocol for accessing and maintaining distributed directory information services over an Internet Protocol (IP) network.[1] LDAP is defined in terms of ASN.1 and transmitted using BER.Directory services may provide any organized set of records, often with a hierarchical structure, such as a corporate email directory. Similarly, a telephone directory is a list of subscribers with an address and a phone number.
Lets proceed with install and install following required packages
$: sudo apt-get install slapd ldap-utils -y
we’ve used as password for ldap “ric”
Before to make the configuration of LDAP it’s necessary to edit the file hosts
$: sudo nano /etc/hosts
and insert the line
192.168.0.100 ldapserver.ideas.net ldapserver
At this point it’s the time of LDAP, install libnss-ldap package
$: sudo apt-get install libnss-ldap -y
There…
Lihat pos aslinya 755 kata lagi
